flaky veggie and cheese pot pies {and the best decision}
She sat down across from me in the doctors chair and said, “Congratulations, you’ve just made one of the greatest decisions of your life.”
I reacted with a loud laugh but felt like I could burst into tears too.
“I chose to have three kids too, best decision you’ll ever make.”
She didn’t know how much I needed to hear this.

I was feeling overwhelmed with the thought of 3 kids. I realized as I was sitting on the protective crunchy paper (why is that stuff SO LOUD?!) that I’d been pregnant and/or nursing for 5 years straight now only giving my body months of a break in between.
“It’s so wonderful,” She interrupted my thoughts, “You’re going to love it. And you already have one of each! It just doesn’t matter if you get a girl or a boy this third time, pressure’s off because you have a boy and a girl - so it’s all just the best scenario you could ask for. ”
She didn’t know how much I wanted to hear this.

The decision to have 3 came when I was gathering my kids backpacks. I had two little backpacks in my hand, literally running out the door when I realized I was missing a backpack. So I rushed back inside to grab the third backpack. Except, there was no 3rd backpack, I only have two kids.
That’s when I knew someone was missing. It was the weirdest nudge God’s ever given me, but He knows me well. And after that, I undeniably knew a third kid was meant for our family.
It’s a hard thing to explain and a personal one at that: your family - and how many kids you choose to have - but everyone seems to have an opinion on the matter.
I get comments all the time with my pregnant belly and two toddlers in tow that “I have my hands full.” Or my favorite: “Are you PREGNANT?!” “Going for a third?!”


Anyway, if there’s anything I’ve learned thus far in life it’s to be completely in love with your life. All of it. Embrace each season as it comes because just like that - just like the seasons - it’s over and change is here and you’re doing something different.
It’s easier said than done sometimes, trust me I get it. It’s hard to enjoy my beautiful children fighting (PLEASE SHARE) or screaming (Sweetheart it’s time to go home! We can’t stay forever!) or whining at me - but as pregnancy seems to be a conversation starter among new people - an older grandpa gentleman recently said to me:
“These are the best years of your life. Really. Cherish it. Because before you know it they’re grown up and gone.”
I actually cried on the way home after that one.
He didn’t know how much I needed to hear that.
So my friend, here’s hoping you also see the nudges from God, embrace motherhood and all it’s messiness and love your current season.
Annnd a note on these pies. They’re amazing. Truly, the cheese sauce mixed with the roasted veg and that flakey buttery crust. Heaven. Like they are soooo are worth the time, and dare I say perfect for the season you’re in right now. It's always pie season ya know?
So much love for you. Xo Robyn

This post was sponsored by Kerrygold. I adore everything Kerrygold and the Blarney Cheese used for the cheese sauce here is no exception. Seriously this stuff is fought over in our house. WHO ATE THE LAST OF THE BLARNEY CHEESE? You need it, it makes these pies sing in a way that no other cheese can. Trust me. And while you're at it, please use Kerrygold butter for the crust. It's everything.
flaky veggie and cheese pot pies
There is something beautiful about these pies and I think it’s the fact that they are so satisfying and hearty yet there’s no meat. The cheese in the sauce is unexpected and glorious...almost a secret? It will leave you wondering what makes these pies so extraordinarily good and then when you find out it’s the cheese you’ll be like, duh, THAT’s what makes these amazing.
You can be as generous as you’d like with the veg here. I tried to keep the sauce to veg ratio juuuuust right as I love a good saucy pie. So if you’d like to add more veg, be my guest, just keep in mind that more veg = a less saucy pie.
for the crust
4 ½ cups / 540g all purpose flour, (preferably organic )
1 teaspoon kosher salt ((if using sea salt you may need a little more))
1 ½ cups / 355g Kerrygold unsalted butter, very cold, cut into 1 - ½” cubes ((don’t stress too much about the size of your butter here, a variety is good) )
½ cup / 100ml ice cold water
One egg, beaten, 1-3 tablespoons of cream, flaky sea salt and a pastry brush to brush on top of the pie crusts when ready to bake.
for the filling
2 cups / 120g broccoli, (raw and chopped into bite sized pieces)
1 ½ cups / 200g raw yukon gold potatoes, (chopped into 1/2“ chunks)
2 cups / 240g raw carrots, (chopped into thin coins)
2 cups / 220g raw chopped cauliflower, (cut into bite sized pieces)
2 cups / 117g raw chopped leeks, sliced thinly
Olive oil, 1 tablespoon Kerrygold butter and kosher salt for roasting
for the sauce
½ cup / 85g all purpose flour
¼ cup / 55g Kerrygold unsalted butter
1 ½ cups / 350ml whole milk, (room temperature)
1 ½ cups / 350ml chicken stock or veggie broth, (room temperature)
1 clove fresh garlic, minced ((about ½ teaspoon - but you can definitely use more if you want more))
1 teaspoon Worcestershire sauce
½ teaspoon salt, or more to taste
2 cups / 200g Kerrygold Blarney gouda cheese, freshly grated
½ cup / 120ml cream (optional)
Freshly cracked pepper to taste
bakers tips
This recipe can be thought of in three parts: the crust, the veg and the sauce. The veg can easily be roasted and refrigerated a few days ahead of time. The crust can also be made 3 days in advance and chilled, as well as the cheese sauce. If you have a pizza stone, it’s a wonderful thing to have in the oven when it comes time to bake your pies so that the bottom of the pie crust cooks perfectly. If you don’t have a pizza stone you can use a sheet pan.
for the crust
Please note that the crust needs time to rest so it’s best made a day ahead of time or the morning of the day you want to make the pies for dinner so it has time to rest.
Bakers note: Making pie crust in a standing mixer (I have a kitchen aid) is a quick way to make pie crust and one of my favorite secrets when I just don’t have the time to make pie crust completely by hand. Cold ingredients are key here, so don’t skip that part.
In a standing mixer, mix together flour, salt and butter on low-medium speed until the butter starts to combine with the flour. It should appear to have different sized pebble-like chunks. You want big chunks and small chunks here.
Scrape down the sides with a rubber spatula, turn on low speed, and slowly stream in your chilled water a few tablespoons at a time.
Mix until the dough slightly starts to come together. Depending on where you live and the weather, you may need a little more or a little less water added to your dough.
Once the dough starts to come together (meaning you don’t just see pebbles, but the dough starts sticking in larger chunks), turn off your mixer and finish kneading it with you hands, but still in the bowl, until it all comes together to form a scraggly + smoothish dough.
Split the dough into two flat disks (if you’d like to weigh it in to exactness, you’ll get about 490-ish grams per disk). Cover in plastic wrap and chill for at least an hour or two.
for rolling the dough
Making one large pie? See specific instructions towards the end!
After dough disks have chilled, let them rest at room temperature until they can roll out comfortably without cracking. How long your dough sits out all depends on how long your dough has been chilled and how cold your kitchen is. It can be anywhere from 20 minutes to an hour. I usually chill my disks overnight and let them sit at room temperature for an hour.
Using a rolling pin and extra flour, roll out one disk of dough about 1/8th of an inch in thickness. (Bakers tip: Roll away from your body, then rotate the dough clockwise little by little. Repeat this process until the dough is rolled out to your desired thickness.)
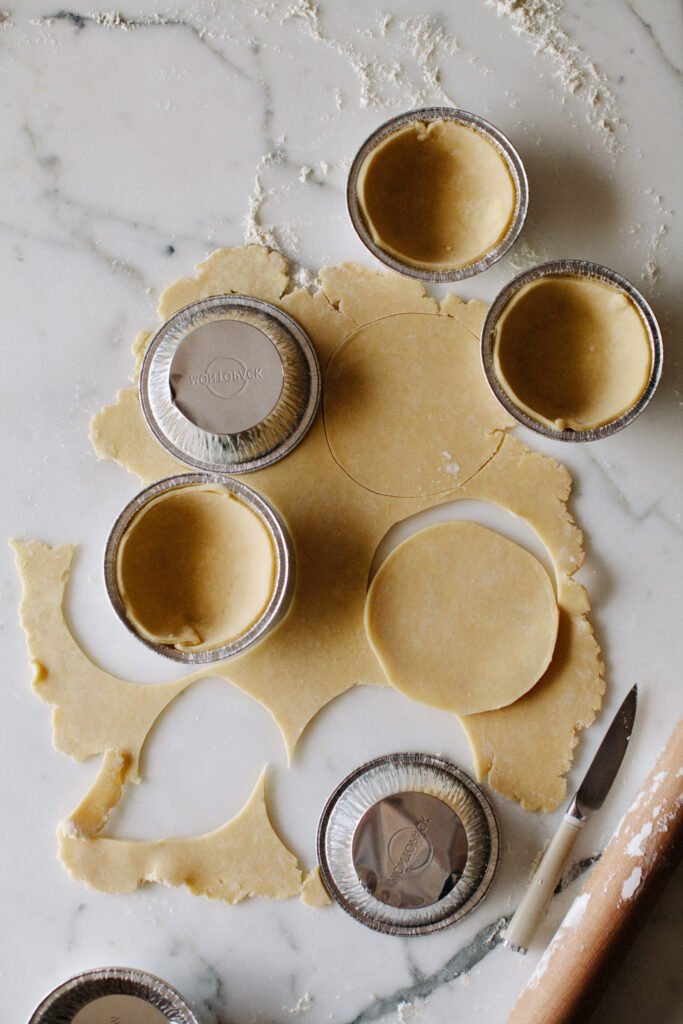
Then use your little pie tins (flip them upside down to measure!) tomeasure out the bottom of each crust piece and cut around each tin with a sharp knife - I have a video showing you how to do this! I used 5inch disposable tins and got 8 bottom crusts out of one disk of dough. For the bottom crust, I cut the dough very closely to the tin, so when I pressed the dough into the bottom of each tin, it did not spill over the sides at all, in fact it looks too small for the tin but trust me, we want the bottom crust small, this method works really well with small pies, AND it gets the most out of our pie dough.
Roll the second disk to a similar thickness, flip over each pie tin and cut about ½ inch outside of the pie tin - so we’re not cutting as closely to the tin here. We need extra dough for the pie tops. Does that make sense?
To store: Line two sheet pans with parchment paper and put all of the pie tins lined with the crust bottoms on one sheet, and the rolled out circle pie crust tops to rest on the other sheet pan. Cover with each sheet plastic wrap and chill for at LEAST an hour. This can also be done days ahead of time and kept in the fridge.
for the veg
You’ll need to cook each veggie separately to ensure they’re all cooked evenly. So just be prepared with all the sheet pans and parchment paper you can muster. The chopping and the clean up is the hardest part here, other than that, it’s all easy. To make it seem easier, the veg can easily be roasted a few days ahead of time and stored in the fridge.
Preheat the oven to 400F / 205C.
Fill a medium pot with cold water and the potatoes. Add a generous amount of kosher salt and boil the potatoes until just tender. (This takes me about 15 mins?) Keep an eye on this as you chop and roast the rest of the veg. When potatoes are done, drain them completely and set aside to cool and dry.
Chop your veg into bite sized pieces - see ingredient list for my recommendation on how to cut them.
Line sheet pans with parchment paper, and start with one veggie to roast. Let’s start with broccoli. Spread the broccoli out evenly and generously drizzle with olive oil, toss to coat each piece and sprinkle with kosher salt.
Roast for 10 mins or until broccoli is bright green and slightly browned on some parts.
Roast cauliflower using this same method, using a fresh sheet pan with a fresh sheet of parchment paper, coating the veg generously with olive oil and seasoning with kosher salt. It’s important that each veg is cooked separately to ensure they’re each cooked properly.
Roast cauliflower for 10-15 minutes or until slightly browned on the outside.
Repeat the same baking process for the carrots, lining a new sheet pan with parchment, olive oil etc. and roast for 10 minutes or until they appear slightly browned.
In a large heavy bottomed saucepan, melt 1 tablespoon butter over medium heat. Add chopped leeks and pinch of kosher salt and cook until leeks appear soft and soak up the butter, about 10-15 minutes.
Let all of the veg cool. If making days ahead of time, store all veg in an airtight container and keep in the fridge until needed. You do not need to bring the veg to room temperature before mixing them with the sauce and putting them in the pies.
for the sauce
The sauce is the one thing I recommend doing right before baking the pies, especially if you roast the veg a few days ahead of time and have cold veggies. But the sauce can easily be made days ahead of time, it will just need to be reheated before mixing with the veg and poured into the pie tins, as it solidifies in the fridge.
Bakers tip! Have ALL of the ingredients for this measured out ahead of time and close by.
If you’re baking the pie right now, preheat the oven to 450F / 232C and put a pizza stone or sheet pan in there to get really really hot.
In a heavy bottomed, medium saucepan, melt butter and then whisk in flour over a medium heat. This will be lumpy, but don’t worry.
Add milk about 2-4 tablespoons at a time (just eyeball this) and whisk constantly as you combine the flour + butter mixture with the milk.
The key to a smooth sauce is adding the liquid to the flour SLOWLY. You want to add a little liquid, whisk until it’s absorbed, then add a little more liquid, and whisk until absorbed. Repeat this process until the milk is completely incorporated with the flour + butter. It will all be lumpy and thick at first, this is normal, just continuously whisk and add liquid, and make sure your heat isn’t too high.
After the milk is absorbed, repeat this process with the chicken or veggie stock. After adding all of the liquid slowly you should have a thick, smooth sauce.
Whisk in fresh garlic, salt, Worcestershire sauce and freshly cracked black pepper.
Turn heat to low, add shredded cheese and whisk in until melted. Taste sauce to see if it needs more salt and pepper.
Get a really really large bowl or pot to mix your sauce and all of the veg together. Once cheese is melted whisk in your cream to thin the sauce a little bit. Taste, see if it needs any salt or pepper.
Take your chilled pie and prepared crusts from the fridge. (Making one large pie? See specific instructions below!)
Gently scoop filling into prepared pie tins lined with dough. Eyeball the filling and try to fill each pie evenly.
Once all the tins are filled, place the pie disks on top of each pie and crimp and press to the tin. If your pie tops are cracking a little bit as you try to crimp them, that’s okay- it just means your dough is cold, the heat from your fingers will fix this as you continue to crimp and press. It will come together.
Prepare egg wash by beating egg with cream in a little bowl. I think the cream is key here, so don’t skimp on it. You want just enough to “water down” the egg so it looks slightly creamy.
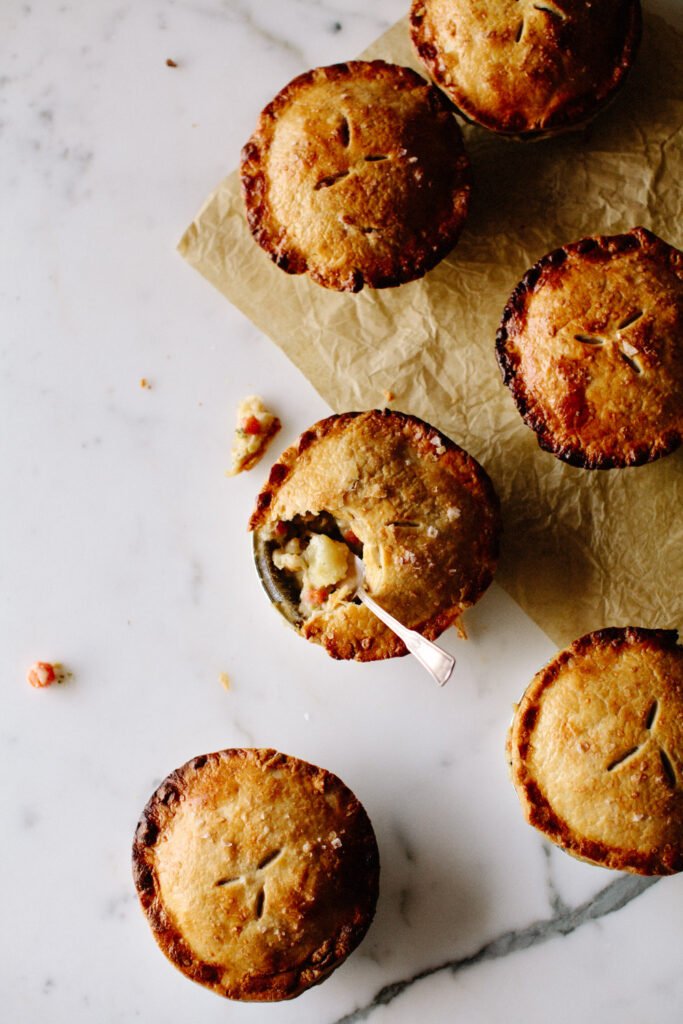
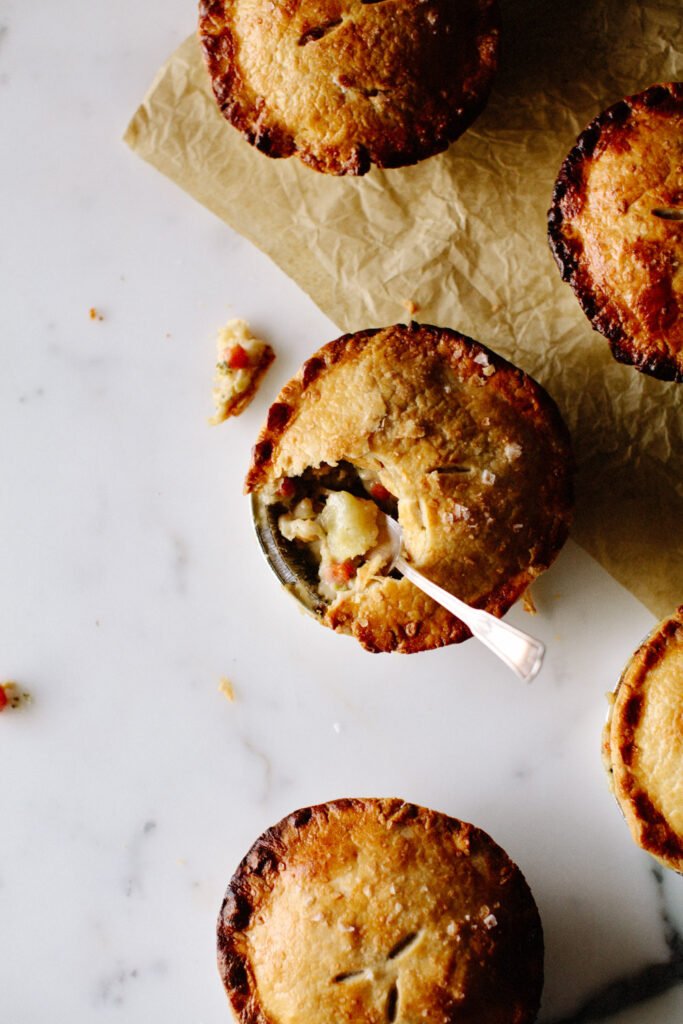
Brush each pie crust top with the egg wash and cut three tiny slits in the top with a sharp knife and sprinkle with flaky salt.
Place pies on a cool baking sheet with fresh parchment paper and place on top of the hot pizza stone OR hot baking sheet in your oven. Bake for 30 minutes at 425F / 232C or until crusts are golden brown and the filling is bubbly. You know your oven better than I do, so use your best judgement here.
Serve pies immediately. These are SO GOOD and wonderful you won't believe it. Or these store beautifully in the fridge, cooled and tightly wrapped for up to a week. If you’d like to enjoy them later than that, they store really well in the freezer for up to 3 months, tightly wrapped.
to reheat
Cover each pie completely with foil and bake at 400F/ 205C for 10 minutes.
to make a large 9-10" pie
Preheat oven to 425°F / 232°C and place a large sheet pan or pizza stone on the middle rack to get hot.
Take out your two disks of chilled brisée dough. Flour a clean surface and roll each disk into a 12-inch circle at about ⅜-inch thick. (It can be a little thinner than this too, don't stress. Also if you're finding that it's a little difficult to roll out, let it sit out at room temperature for 5 minutes or so. It will warm up as you roll it.)
Press one dough circle into a 10-inch pie tin, trimming the excess dough. Place in the freezer for 10-15 minutes while you roll out the other disk.
Fill the pie with your filling. The filling comes very high out of the pie tin - create a dome out of it and gently lay the other 12-inch circle of dough over it. Cut excess dough and pinch the bottom and top dough pieces together and cut 3-4 slits in the top to let out the steam.
Liberally brush the pie with one beaten egg using a pastry brush and top with flaky sea salt (or kosher salt) and freshly cracked black pepper. Without taking it out of the oven, place the pie on the hot sheet pan in the oven to bake. This ensures that our bottom crust wont be soggy.
Bake for 45 minutes to 1 hour. Cooking time depends on the heat of your filling and your oven. Filling should be bubbly and the crust should be a deep golden brown. When you can smell it baking, it usually means it's close to ready.
Serve warm and congratulations! You made an amazing pie!! xo
Resources:
This is the cheese you need for this pie. It's Kerrygold Blarney Gouda. You can find it close to you using their store locator tool.
I used these pie tins to make the little pies.