my perfect banana cream pie


my perfect banana cream pie (vanilla bean specked custard with a buttery salty graham cracker crust)
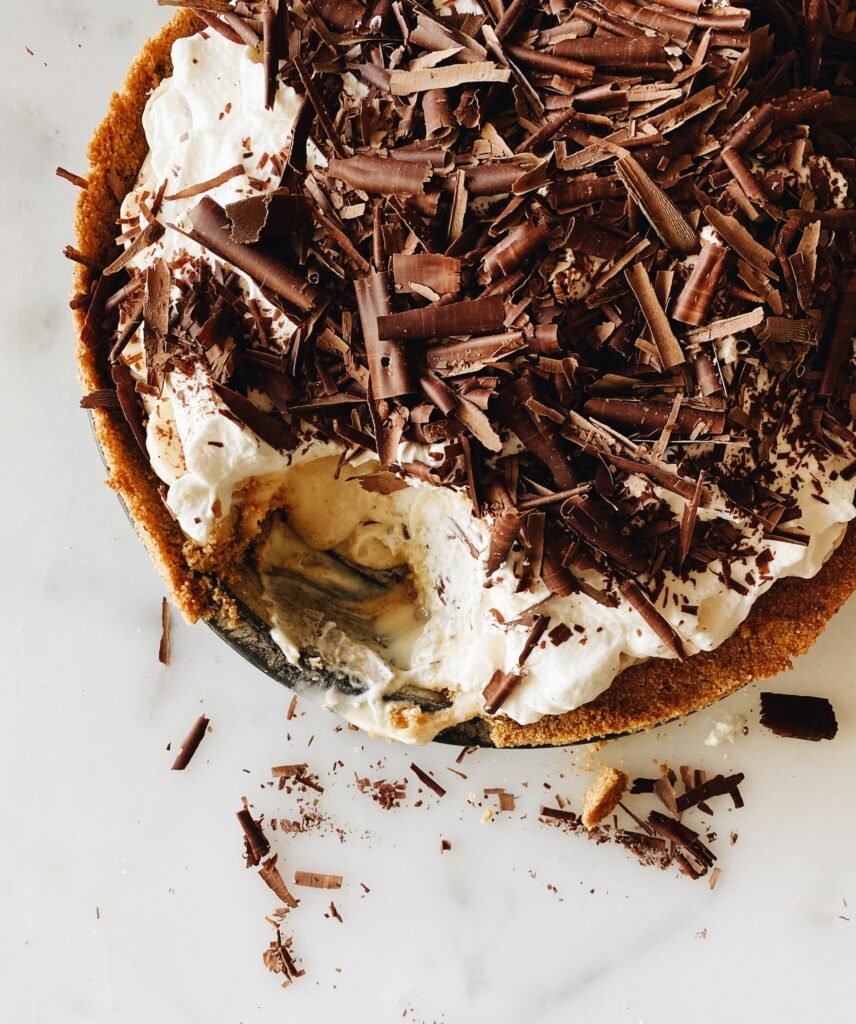
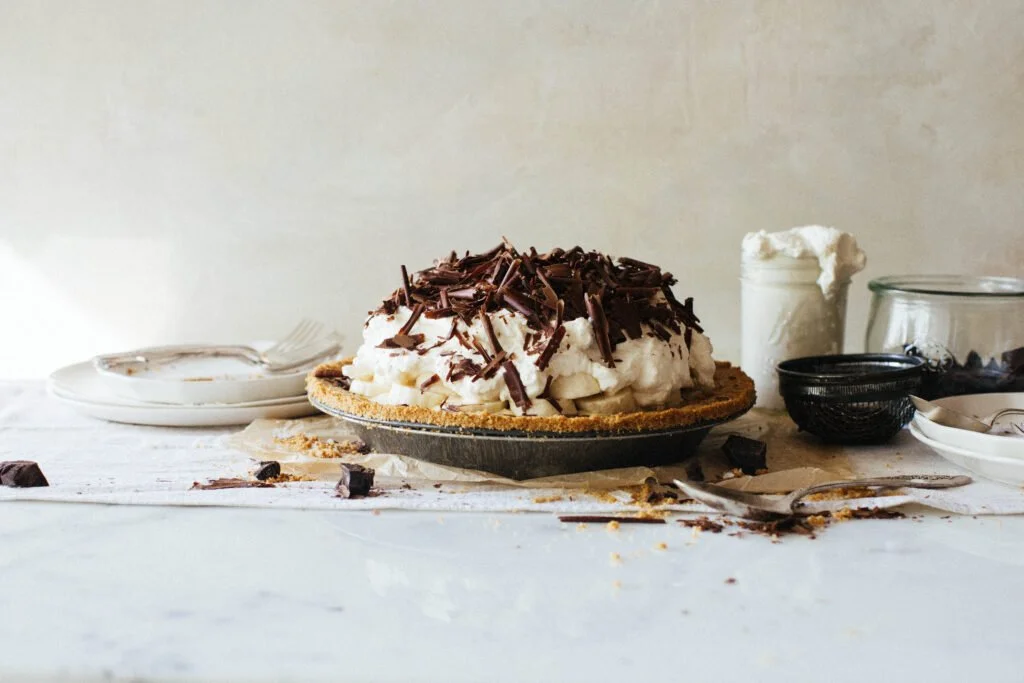
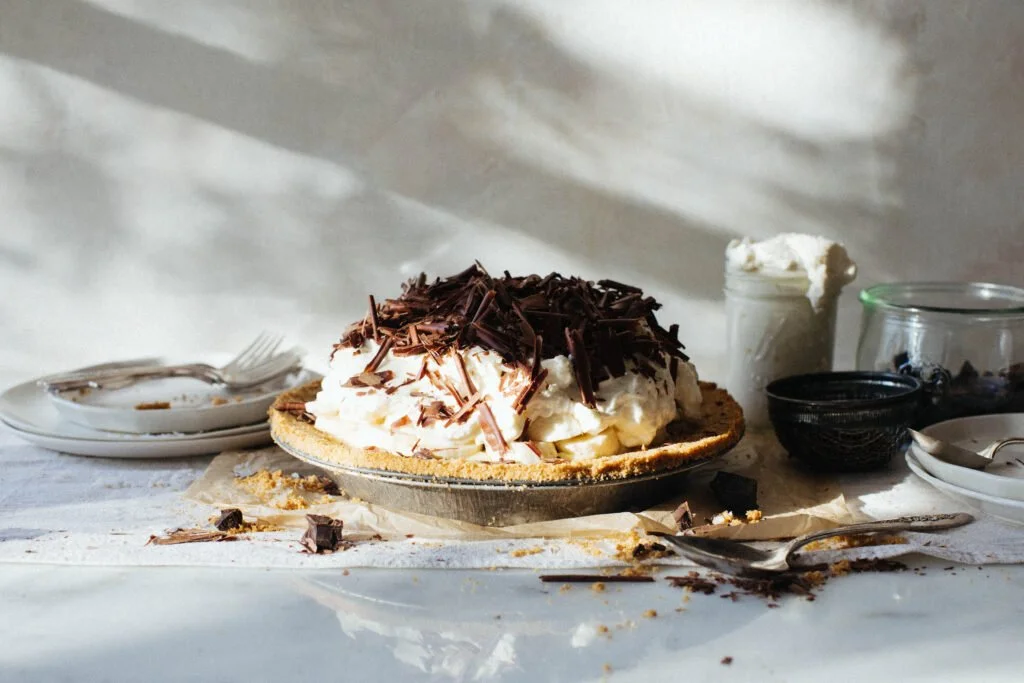
You know those banana cream pies where you cut into them and the custard part is so thick it just stays perfectly in it’s sliced shape? Yeah we don’t do that here. This custard is just thick enough, but still soft, just the way custard should be. It has flecks of vanilla bean and just a touch of white chocolate to give it depth, but it by no means tastes like overly sweet white chocolate. I’ve always thought a banana pie with regular pie crust was boring and bland, give me something extra you know? A buttery, salty graham cracker crust is the answer. Sigh, I dare say this pie is divinely perfect. Well, it’s my perfect banana cream pie.
Before you start, I recommend doubling the custard recipe if you can. There is something so special about a massively filled custard pie. You’ll have extra vanilla custard, but it never seems to go to waste. 😉
A few notes on making this pie a success: This recipe, while somewhat easy, is like a dance or getting married; it’s all about timing. I like to make the custard a few days ahead of time, and the crust a day ahead of time, OR ready the morning of. The custard needs to chill for a few hours before using, and the crust needs to be completely cool before you can pour in the custard. When you have a prepared chilled custard and crust, the recipe is a breeze from there. I cut the bananas right after I put in the custard in the crust, and then top with freshly whipped cream.
for the custard:
2 cups + 2 tablespoons / 500g whole milk
1 tablespoon vanilla extract
1 whole vanilla bean ((if you don't have one you can still make this custard! ;) )
⅓ cup / 67g granulated sugar
2 large eggs
5 tablespoons / 35g organic cornstarch
½ teaspoon kosher salt
¼ cup / 45g white chocolate chips ((highest quality you can find))
¼ cup / 60g Kerrygold salted butter
for the crust:
2 / 9 ounces / 255g graham crackers, (pulsed into crumbs in a food processor)
¼ cup / 35g almond meal
½ cup + 2 tablespoons / 140g Kerrygold salted butter, (melted)
½ teaspoon - ¾ teaspoon kosher salt ((use ¾’s teaspoon if you’d like it a tiny bit on the salty side) )
¼ cup / 45g light or dark brown sugar
for the whipped cream:
2 cups / 480-500g heavy cream
1 ½ tablespoons superfine or granulated sugar
½ tablespoon vanilla extract
3-4 fresh bananas for slicing
Huge dark chocolate bar for creating chocolate shavings or chopping up finely or you can use mini chocolate chips, (optional)
to make the custard
First: Get a medium sized, heavy bottomed saucepan. You don’t want a thin-bottomed pan or else your custard will be more likely to burn and curdle. Think: enameled cast iron or thick stainless steel saucepan.
Second: Prepare a fine mesh sieve over a medium sized bowl (preferably glass or stainless steel - not a plastic bowl) and put that bowl on top of a bigger bowl of ice to create an ice bath. Don’t fill it with a ton of water, just a tiny bit because the heat of the custard will melt the ice quickly and we want to make sure it stays cold.
In a medium bowl whisk together eggs, sugar, cornstarch and salt. Whisk until there are no lumps and then set aside.
In a medium sized saucepan heat milk and vanilla bean until almost scalding. You don’t want the milk to burn or boil, so don’t walk away from it.
Once milk is scalding and turn off the heat. Whisking constantly, add hot milk about ½ cup to 1 cup at a time, streaming it very slowly to the egg + cornstarch + sugar mixture. This is called tempering. :) Continue to repeat this process until all of the milk is added, again whisking constantly.
Bakers notes: Tempering means we’re blending the milk and egg mixture together slowly, so that the eggs don’t curdle and scramble when we heat this mixture again to thicken and become custard.
Add this mixture back to the medium sized saucepan and heat over a medium-low heat until it barely starts to thicken. Use coated whisk (if you have one, if you don’t just use a regular whisk) to stir constantly and scrape the bottom of the saucepan to know when the mixture is thickening and to prevent curdling. The thickening of the custard happens SO FAST, so as SOON as it starts to feel a thick, remove the custard from the heat, and pour it through your prepared sieve and ice bath bowl. If we leave it on the heat for too long it will curdle. If we leave it in the saucepan too long, it will curdle, so it’s imperative that you take it off the heat as SOON as it starts to feel thicker, whisking it constantly. It might get lumpy and thick at the same time, that’s okay! Just quickly take it off the heat and into the sieve.
Bakers notes: For me, my custard gets thicker after about 3-5m minutes over a medium-low heat.
Using a rubber spatula or whisk push the custard through the sieve. If your custard is a tiny bit lumpy, the lumps should disappear after putting it through the sieve. If the lumps don’t disappear then you may have scrambled your eggs and will need to start over.
Bakers notes: How do I prevent my custard from curdling again?I’ve done this! Don’t feel bad! It happens to all of us. To prevent this from happening again, make sure you take your custard off the heat the INSTANT it starts to feel slightly thicker. You may also need to try a different sauce pan ( with a thicker bottom) and try really whisking / stirring constantly if you didn’t do this the first time.
Gently stir the salted butter, white chocolate chips and vanilla extract into the custard until just combined (take care not to overmix!!!) and then cover it with plastic wrap and chill in the fridge. The custard can be made up to 5 days in advance, if kept very cold and sealed in the fridge.
Chill the custard for at least a few hours.
to make the crust
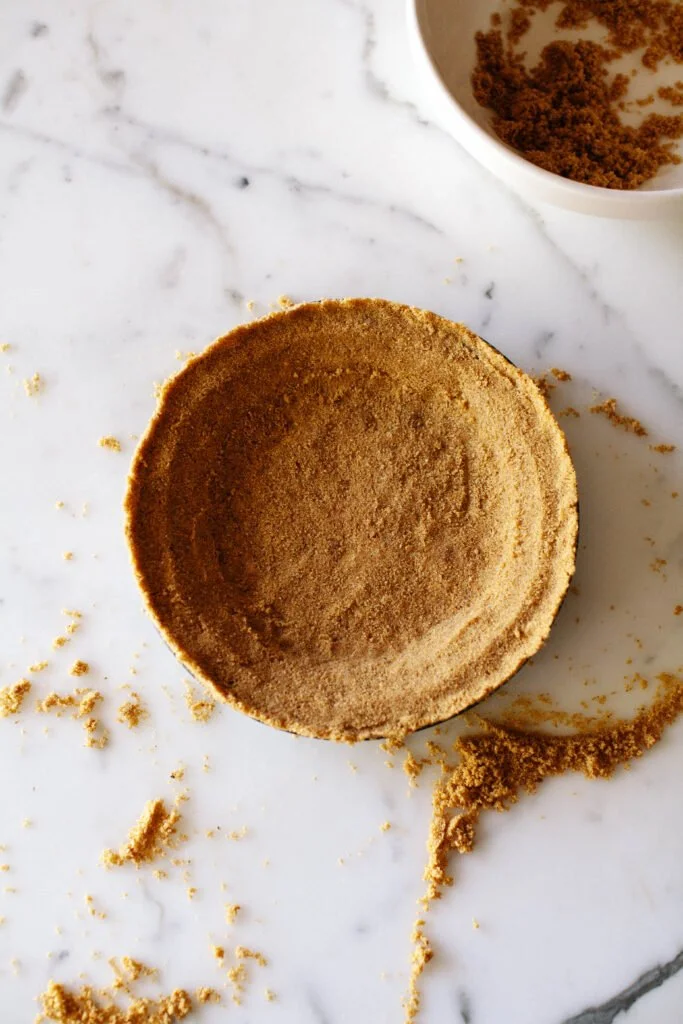
Preheat oven to 350F / 180C and grab a 9” or 10” pie tin.
Melt butter. Measure grahams. If using a cup measurer it’s easier to crumble the grahams into crumbs and then measure. If weighing your grahams, I'd just weigh them whole and then pulse. Put all ingredients except the butter, into a food processor and pulse until combined. Then slowly add and pulse the melted butter in. You may need to scrape it down and mix a little before adding all of the butter. Mixture should resemble slightly wet sand, and stick together when you squeeze it tightly. If it doesn’t stick together at all, you may need to add a little more butter. If the mixture is TOO wet, add a few more grahams.
Bakers note: Don’t stress too much about the exactness here. You may need a little more butter or a little more graham cracker to get it to the right consistency, but that’s the beauty of this crust. It’s very forgiving. Sometimes I need a little extra tablespoon of butter cause it’s a super dry day. So don’t be afraid of tweaking this to get the right consistency.
Press the graham cracker crumbs firmly into the pie tin. Really take your time pressing here. You may have some left over crumb and not use ALL of it for your pie.
Bakers tip: You can put your pie tin on a cookie sheet to help you get it in and out of the oven easier.
Bake crust for 7-10 minutes or until it’s very lightly golden brown. Try not to overbake.
Cool crust completely before pouring in your custard.
Once your crust is cooled, gently fill with custard, spreading it evenly and then place your freshly sliced bananas. Top with fresh whipped cream (have fun with it!) and chocolate shavings. Chill for a few hours before serving, or serve immediately. The entire pie can be assembled the morning before you serve it, but no sooner than that or the bananas get funky and brown.
to make the whipped cream
Whip all ingredients together in an electric mixer until light peaks form, this should take just a few minutes. Take care not to overwhip. If you overwhip and whipped cream becomes lumpy, just add a splash of cream or two, and gently fold that in until it’s not lumpy anymore. I’ve found great success in chilling my mixing bowl before whipping my cream to get it to whip up really fast and stay chilled. :)
Frequently Asked Questions:
Can I make this ahead of time?
You can make the custard and crust up to 3 days ahead of time, tightly wrapped (and custard chilled of course!;)
You can assemble the pie in it’s entirety the morning of serving, but I wouldn’t assemble any sooner or else your bananas will brown.
Can I double this recipe?
You can easily double this custard recipe. I like to double the custard often so I have extra “vanilla pudding” for the kids on hand and a massively filled custardy banana cream pie.
Do I need a food processor?
A food processor makes the graham cracker crust a breeze, but if you don’t have one, crushing the grahams into crumbs using force and a large plastic bag works just fine.
The HUGE Trader Joe’s dark chocolate bars are the perfect bar to create chocolate curls from!
This post was sponsored by Kerrygold Butter

This post was sponsored by Kerrygold Butter. I adore Kerrygold. It's hands down my favorite butter.